TM 5-3805-293-23-5
0302
INSTALLATION CONTINUED
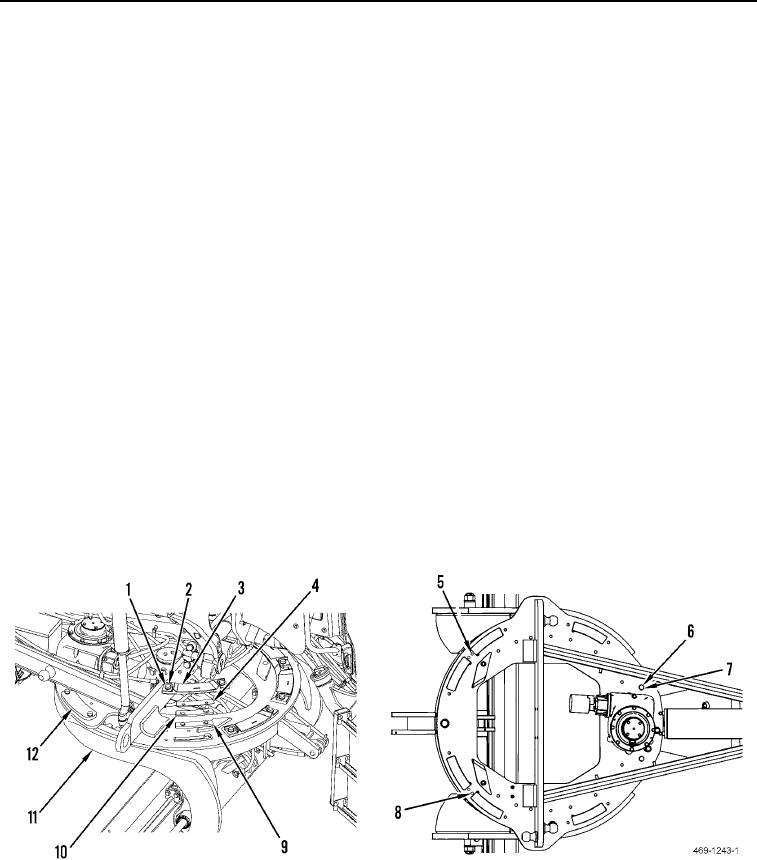
48. Install bolt (Figure 49, Item 2) on drawbar (Figure 49, Item 11) at hole (Figure 49, Item 5). Tighten bolts to firmly
seat circle against shoes.
49. Install bolt (Figure 49, Item 2) on drawbar (Figure 49, Item 11) at hole (Figure 49, Item 8). Tighten bolts to firmly
seat circle against shoes.
50. Remove two pusher bolts (Figure 49, Item 6) and spacers (Figure 49, Item 7) from drawbar (Figure 49,
Item 11).
51. Install two pusher bolts (Figure 49, Item 6) without spacers (Figure 49, Item 7) on drawbar (Figure 49,
Item 11). Tighten bolts to firmly seat circle against shoes.
52. Install six wearstrips (Figure 49, Item 9), spacer plates (Figure 49, Item 10), and shims (Figure 49, Item 4) on
drawbar (Figure 49, Item 11).
a. Install shims until shims are flush with top surface of drawbar.
b. Shims must not be on top surface of drawbar before retainer plates are installed.
c.
Shims must be within inside of pocket.
53. Remove bolt (Figure 49, Item 2) from right rear alignment hole (Figure 49, Item 8).
54. Install two plates (Figure 49, Item 3), four washers (Figure 49, Item 1), and bolts (Figure 49, Item 2) on rear
right side of drawbar (Figure 49, Item 11).
55. Remove bolt (Figure 49, Item 2) from left rear alignment hole (Figure 49, Item 5).
56. Install two plates (Figure 49, Item 3), four washers (Figure 49, Item 1), and bolts (Figure 49, Item 2) on rear left
side of drawbar (Figure 49, Item 11).
57. Remove two pusher bolts (Figure 49, Item 6) from drawbar (Figure 49, Item 11).
58. Install two spacers (Figure 49, Item 7) and pusher bolts (Figure 49, Item 6) on drawbar (Figure 49, Item 11).
59. Install two plates (Figure 49, Item 12), four washers (Figure 49, Item 1), and bolts (Figure 49, Item 2) on
drawbar (Figure 49, Item 11).
Figure 49. Wearstrips.
0302
END OF TASK

