POWER TRAIN
DISASSEMBLY AND ASSEMBLY
TM 5-3805-263-14&P-2
FINAL DRIVES
6.
7.
8.
9.
10.
11.
12.
13.
14.
2-60
Install the washer in the carrier. Install the
large retaining ring that holds the washer
with tool (B).
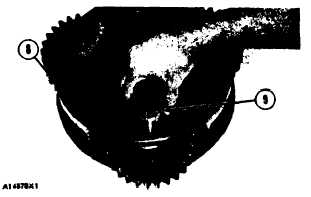
Install the rollers in the gears. Install the
gears and the washers in planet carrier (8).
Install shafts (9) that hold the gears in the
planet carrier. Install the retainers, the bolts
and the locks that hold the retainers. Bend
the locks against the bolts.
Put the carrier on its other end. Fasten a
hoist to the carrier. Put planet carrier (8) in
position on shaft (6) and in ring gear (2).
Install pinion (10) in the planet carrier.
Install a wire to hold the planet carrier in
position in the housing.
Install O-ring seal (11) on the housing.
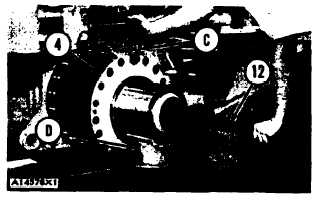
Install tooling (C) on housing (4). Fasten a
hoist to tooling (C). Lift housing (4) and
put it in position on tooling (D) and a floor
jack. Put axle (12) in position in the
housing to help keep the housing in balance.
Move the final drive housing toward the
bevel gear case. Remove the wire that holds
the planet carrier in the housing. Remove
tooling (C) and the hoist from the housing.
Put the final drive housing in position over
the studs in the bevel gear case. Install the
nuts and the washers that hold it. Remove
tooling (D).
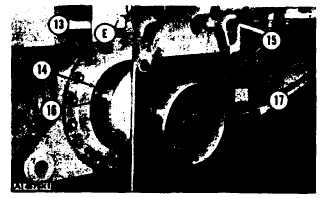
Tighten nuts (13) to a torque of 300 ± 15 lb. ft.
(408 ± 2.0 mkg). If removed, install new seal
(14) into outer housing (17) flush with end. Put
STP OIL TREATMENT or CASITE MOTOR
HONEY on the seal and inner housing surface.
Install tooling (E) on the outer housing.
Fasten a hoist to tooling (E). Put some oil
on the inside surfaces of the oscillation
bearing rings (15) and on the outside
surface of the inner housing. Install rings
(15) in outer housing (17). Install washer
( 16) on the inner housing. Washer (16) is in
three sections. Put some clean grease on the
washer.
Put housing (17) in position on the inner
housing. Rings ( 15) and housing (17) can be
moved with a soft hammer if necessary.
Remove tooling (E).